


7.
A Quick Tour of CodeWarrior
This short tour gives new users a glimpse of the CodeWarrior Integrated Development Environment (IDE).
Guided Tour Overview

The CodeWarrior IDE is the center of CodeWarrior software development. From the IDE you edit, browse, compile, link, debug, and do many other programming tasks.
In this quick tour, you'll learn to do these tasks while working on an example project, gnu_go.mcp:
Launching the CodeWarrior IDE
In this section you learn how simple it is to launch the CodeWarrior IDE, thereby opening the gateway to a powerful set of programming tools and beginning your career as a code warrior.
Before you can begin learning about the CodeWarrior IDE, you'll need to launch it.
Windows
Click the Start button in the Task bar, choose Programs, choose CodeWarrior Pro5, then choose the CodeWarrior IDE item.
 NOTE
NOTE
The CodeWarrior IDE item will be in a different place in the Start menu if you didn't use the Start menu default setting while installing CodeWarrior.
Mac OS
Double-click the CodeWarrior IDE icon in the Metrowerks CodeWarrior folder. The CodeWarrior IDE application launches, and its menu bar appears at the top of the screen.
Solaris /Linux
Type cwide in any terminal window. An action/run dialog box appears. Click OK. The IDE is launched on a Run terminal window.
NOTE
This procedure of launching the IDE on Solaris assumes that the CodeWarrior directory has been included in your path.
The next section shows you how to customize the IDE.
Opening a CodeWarrior Project
Open a project file in exactly the same way you open any other file from within an application on your computer. In this step you open the gnu_go.mcp project file.
NOTE
The gnu_go.mcp project is stored on the CD in compressed form, either as a .zip (Windows) or a .sit (Mac) file. You will need to uncompress the archive associated with your platform to use the project files.
A project is a collection of files and settings that the IDE's compilers and linkers use to create a program or other piece of software.
To open a project choose the File`Open menu item to display a file dialog box. Then locate and select the gnu_go.mcp project file and click Open. This file is in the CodeWarrior Examples folder in the CoreTutorials folder on the CodeWarrior Professional Reference CD.
The IDE opens the project file and displays a Project window.
Now that you have a project open, let's explore the features of the Project window.
Using the Project Window
To effectively use the CodeWarrior IDE, you should be familiar with the Project window. The window displays lots of information about a project, so identifying and understanding that information is our next step. The Project window has these items:
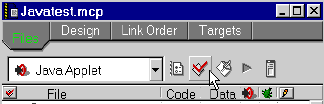
View Tabs
The Project window uses view tabs to present different faces of information in the project. Click a view tab to change the information displayed in the Project window.
Figure 7.1 View tabs in the project window

The Project window uses these view tabs:
NOTE
The Link Order view sometimes has a different name. For example, when working with Mac OS 68K projects, the Link Order view becomes the Segment view and in embedded projects it displays as Overlays.
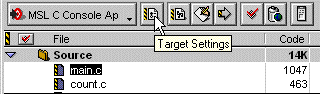
Toolbar
The Toolbar shows icon buttons that correspond to CodeWarrior IDE commands and functions.
Figure 7.2 The default toolbar in the Project window
The toolbar appears in two formats:
For information on customizing, hiding, and showing toolbars, see the IDE User Guide.
Toolbar Tooltips
Use Tooltips to identify a button in a toolbar.
Windows
To view a Tooltip, position the mouse pointer over the button without moving it for a moment.
Mac OS
To view a Tooltip, press the Control key and position the mouse pointer over a toolbar button.
Solaris/Linux
Toolbar Tooltips are currently unavailable for Solaris.
The Tooltip appears, describing the icon underneath the mouse pointer (Figure 7.3).
Figure 7.3 Viewing a Tooltip (on Windows)
Project Window Columns
The columns that appear in the Project window's File view are listed in the following table.
Table 7.1 Columns in the Project window
Groups
Groups in the File view provide a way to organize project files into logical categories to help you keep track of your files. Groups do not affect the binary code produced by the compilers, only the organization of files within the Project window. Groups can be expanded to display their contents, collapsed to hide their contents, rearranged, added, and deleted from a project.
 TIP
TIP
Groups in the Link Order New/Segments view might have an effect on how object code is arranged in your program. Please refer the appropriateTargeting manual for the platform specific details
Interface Pop-ups
Interface Pop-ups reveal additional information about the group or files associated with it. The two types of interface pop-ups are:
To view an Interface pop-up click on the pop-up menu to the extreme right of the file or group name. The file or group interface pop-up appears. Please refer to Figure 7.7.
Context Pop-ups
The two forms of Context Pop-ups available in the Project window include:
To view a Context Pop-up, position the cursor over a file or group name, then click and hold the mouse button down without moving the mouse (Macintosh) or right-click(Windows). In a moment the File context pop-up appears.
Now that you have a better understanding of the Project Manager, let's move onto the next section on setting preferences.
Setting IDE Preferences
With the CodeWarrior IDE up and running, let's introduce you to the Preferences dialog box. You use the Preferences dialog box to set options that apply to all projects with which you will work with in the CodeWarrior IDE.
This section shows you how to do these tasks with the Preferences dialog box:
Opening the Preferences Dialog Box
To change a preference, the Preferences dialog box must be open. To open the Preferences dialog box choose Edit`Preferences. The Preferences dialog box appears on the screen (Figure 7.4)
Figure 7.4 .The Preferences dialog box
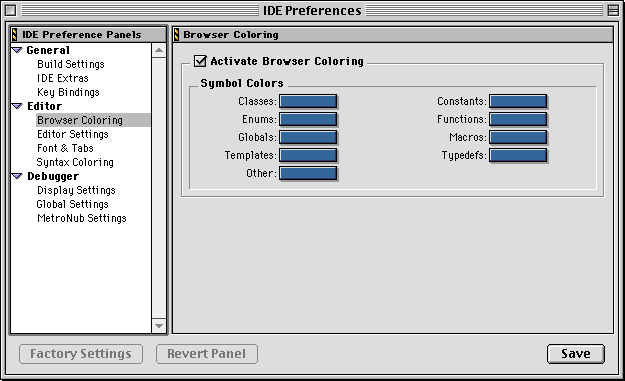
Let's take a moment to identify some of the items in the Preferences dialog box.
NOTE
The preference panels are fully discussed in the IDE User Guide in the chapters Configuring IDE Options and Configuring Target Options.
The Preferences dialog box has three buttons that are always available to assist you in setting the various preference panel options (Figure 7.5).
Figure 7.5 The Preference window's buttons

These buttons are:
Viewing and Setting Options in Preference Panel
There are several different preference panels available in the Preference Panels list. To set a particular preference, you must choose its panel.
To view a Preference panel, click the panel name in the Preference Panel list or use the Up and Down arrow keys to change the selection. The selected panel name is highlighted in the Preference Panel List and the panel appears to the right of the list.
Closing the Preferences Dialog Box
Once you finish setting your global preferences, just close the window. To close the Preferences dialog box, click the Preference window's close box or choose Close from the File menu. The Preferences dialog box closes.
Now that you understand the use of the Preferences dialog box, let's explore the process of opening a CodeWarrior project.
Using the CodeWarrior Editor
The CodeWarrior Editor window is where you will spend most of your time creating, editing, and navigating through source code for your project. This section introduces you to these editing tasks:
Creating a New Text File
To create a new text file, just choose File`New Text File. A new untitled editor window will appear, ready for you to enter, edit, and save text or source code.
Opening a File
There are a variety of ways to open a source code or text file from within a project.
Opening a file from the Project window
You can open any editable text file listed in the Project window. In this step you open the main.c file from the gnu_go.mcp project.
To open the main.c file in the Project window double-click its name in the Project window (Figure 7.6).
Figure 7.6 Opening a file from the Project window

The file opens and appears in its own window.
TIP
You can also select a file in the Project window using the arrow keys and press the Enter/Return key to open it.
Opening a file with a group pop-up
You can also open an editable text file within a group by using the group pop-up that appears to the right of the group name. To open a file from a pop-up menu select the file from a group pop-up in the Project window (Figure 7.7).
Figure 7.7 Opening a file within a group pop-up
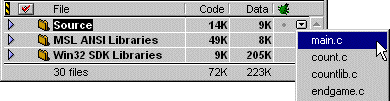
The file opens and appears in its own window.
Opening a file from the File menu
You can use this method to open any text file, whether it is included in the project or not. In this step you open the file endgame.c using the File menu.
To open the endgame.c source code file choose File`Open to display a file dialog box. Locate and select the endgame.c file, then click Open. The file appears in its own editor window.
Entering Text into a File
Now that you have a file open in the editor, you can enter text or source code. The CodeWarrior Editor operates like a regular text editor, with many special features designed to ease navigation that are beyond the scope of this short tour.
To enter text, position the cursor at the point where you want to insert text, click the mouse button to place the insertion point, then begin typing. Your keystrokes appear at the insertion point.
Saving Changes to a File
As you modify your source code files, it's a good idea to save the changes to disk to prevent data loss. To save a file choose File`Save. If the file has never been saved before, a file dialog box will appear prompting you for a location and a name for the file. Click Save when you are done.
The IDE saves the file.
Now that you are comfortable with the IDE's Editor, it's time to explore the Target Settings dialog box.
Target Settings Options
What is a Target?
Before we begin our Targets tour, let's get familiar with the term `Target'. The term Target has two distinct meanings in CodeWarrior terminology. "Target" refers to either the:
· Platform Target - the particular operating system or microprocessor for which you are writing code. For example, if you choose to write code for a particular processor running a desktop OS, you are specifying a platform target.
· Build Target - the particular collection of settings and files that determine what is in your code, and how your code is compiled and linked into the final output. For example, if you choose to compile code with certain language features enabled, then you change the settings in the build target. If you choose to add or remove a file from a particular build, you are changing the build target.
The Build Target settings apply only to the current target of the current project. Settings in one project or target in a project do not affect settings in another project or target. The Build Target Settings dialog box appears very similar to the Preferences dialog box, with many common features.
Projects can contain one or more build targets. Every target in the project has its own unique settings. For example, you can have a debug target and a production target. You use the Build Target Settings dialog box to set a target's options.
This section shows you how to do these tasks with the Target Settings dialog box:
Opening the Target Settings Dialog Box
To change a target option, the Target Settings dialog box must be open. In this step you open the Target Settings dialog box.
To open the Target Settings dialog box choose Edit`Target Settings. Target will be replaced by the name of the current target in the project file. On a PC running Windows for example, the targets include: gnu_go x86, and go_debug. On the Mac OS the targets include: gnu_go 68K, gnu_go PPC, and gnu_go FAT.
The Target Settings dialog box opens on the screen.
TIP
You can also double-click a target name in the Targets view to open the Target Settings dialog box.
Viewing and Setting Options in a Settings Panel
There are several different settings panels available in the Target Settings list. To set a particular target option, you must choose its panel.
To view a settings panel, click the panel name in the Target Settings list, or use the Up and Down arrow keys to change the selection. The selected settings panel appears to the right of the list.
To learn about setting options in settings panels, consult the Targeting manual for the platform on which your program will run.
Closing the Target Settings Dialog Box
Once you finish setting the target options, just close the window. To close the Target Settings dialog box click its close box or choose File`Close. The Target Settings dialog box closes.
Now that you can set Target Settings for projects, it's time to build a compiled application from the gnu_go.mcp project.
Building Projects with CodeWarrior
In this section we'll introduce you to ways of building a project. Among the tasks the IDE provides for compiling, linking, running, and debugging your project are:
TIP
Before using a command in the Project menu to compile or link your project, make sure the IDE will operate on the right target by choosing it from the Set Current Target sub-menu in the Project menu.
Updating a Project
Use Project`Bring Up To Date to compile all modified or "touched" files. This process creates object code for compiled files, but does not link the code into a binary file.
Making a Project
Use Project`Make to link a project into a binary file. Make only creates binary files on the hard disk, it does not interactively run the final application.
Running a Project
Use Project`Run to launch the application created by your project. If the project type is not an application, the Run command is disabled. Run will update and link the code if necessary.
Debugging a Project
Use Project`Debug to launch the application under control of the Debugger. You can then debug your code. Debug will also update and link the code if necessary.
Building a Program
In this step you name the output application for the gnu_go.mcp project, then compile, link, and run it.
To set the application name
1. Open the Target Settings window.
2. Choose the appropriate target for your platform.
Windows
Choose x86 Target in the settings panel list.
Mac OS
Choose 68K Target in the settings panel list.
Solaris
Choose GNU in the settings panel list.
Linux
Choose GNU in the settings panel list.
3. Select Application from the Project Type pop-up menu.
4. Enter "gnu_go" (without the quotes) in the Output File Name field.
5. Click Save.
If an alert box appears asking to re-build the project, click OK.
NOTE
The name of Target in the Target Settings dialog box changes depending upon the target chosen in the Project window.
To build the gnu_go application
With the project information in place, it is now time to actually build the project. In this step you build the gnu_go.mcp project.
Choose Project`Run. The IDE compiles, links, then launches the gnu_go application.
Congratulations! You've just compiled, linked, and executed an application using CodeWarrior.
Where to Go From Here
The IDE makes many of your programming tasks easier. However, not all of the features available in the IDE are covered in this tour. To learn how to use other advanced features, see the IDE User Guide, which is available on the CodeWarrior Professional Reference CD in PDF or HTML format.
For specific information about developing software for a specific operating system or processor, refer to its corresponding Targeting manual, available on the CodeWarrior Professional Reference CD in PDF or HTML format..
For more information on using CodeWarrior, refer to "CodeWarrior Documentation."
Visit the Metrowerks website at: http://www.metrowerks.com
For assistance contact Metrowerks Technical Support at: support@metrowerks.com
Copyright © 1999, Metrowerks Corp. All rights reserved.
Last updated: May 25, 1999


